![[Translate to English:]](/fileadmin/_processed_/b/3/csm_gdpr-3518253_1280__1__738c9599b4.jpg "[Translate to English:]")
Form framework double-opt-In TYPO3 v8
The current TYPO3 version 8 brings the controversial new "forms" framework.
While the maintenance and creation of forms and form fields is now also possible for editors via the backend, certain features are unfortunately not yet part of the form framework.
EXT: Form Double-Opt-In
Today we want to deal with the extension with a double-opt-in.
For this we need a separate extension, in this context we would also like to refer to some best practices in connection with the extension of the EXT: Form Frameworks.
Here is the agenda for the following how-to's:
- Operating principle Double-Opt-In
- Extensions in the form framework
- Own finishers
- Hooks
- Best practices
- Conclusion
How it works:
In the Double-Opt-In registration process, the recipient of the newsletter must confirm receipt of the newsletter. This serves to protect against unwanted emails.
Take a simple newsletter subscription as an example.
If the user completes the registration, he will receive an email with a confirmation link.
If the user completes the registration, he will receive an email with a confirmation link.
Only when this link is called, the registration is completed and the user is added to the mailing list.
Extensions in the Form framework:
Unfortunately, extending the new EXT: Form framework is not as trivial as we initially imagined, mainly due to the configuration over yaml files. For this, it is advisable to take a look at the documentation of Form:
https://docs.typo3.org/typo3cms/extensions/form/
But we want to start from scratch in this tutorial.
It all starts before the first form is created
In order to be able to make any advanced configuration, we have to instruct TYPO3 via TypoScript to load our CustomFormSetup.yaml via the following TypoScript snippet:
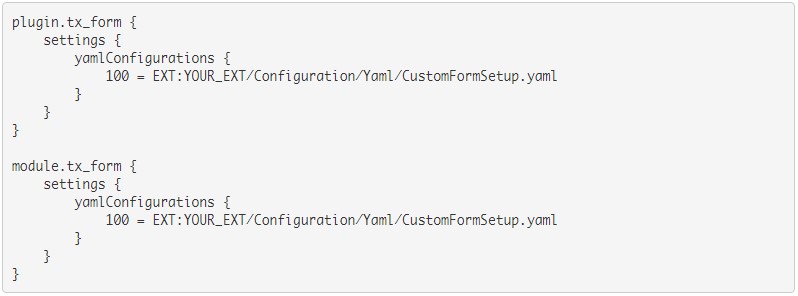
We create the corresponding CustomFormSetup.yaml as well, and fill it with the following content:
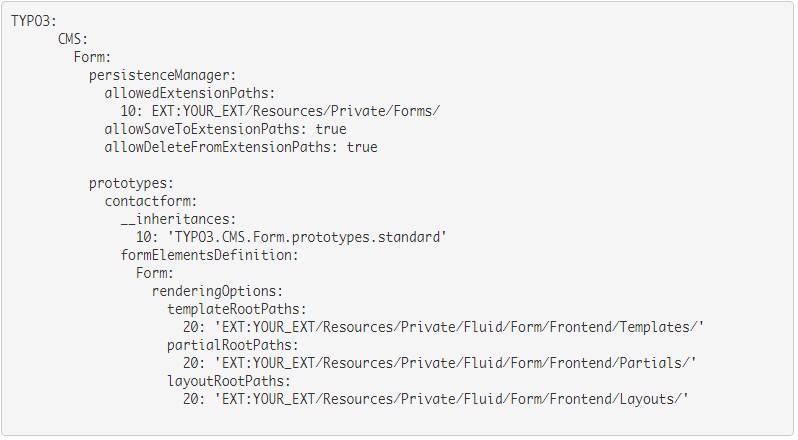
Here are the main options explained:
- allowedExtensionPaths: The directory(ies) in which the forms can be stored or loaded
- allowSavetoExtensionPaths: Allows saving to this path via the form editor
Furthermore, we can define so-called prototypes.
We can then assign our own templates and in our case also our own finishers to the prototype.
Once we have created the files and integrated the TypoScript, we now have to use the option "Form Storage" when creating a new form.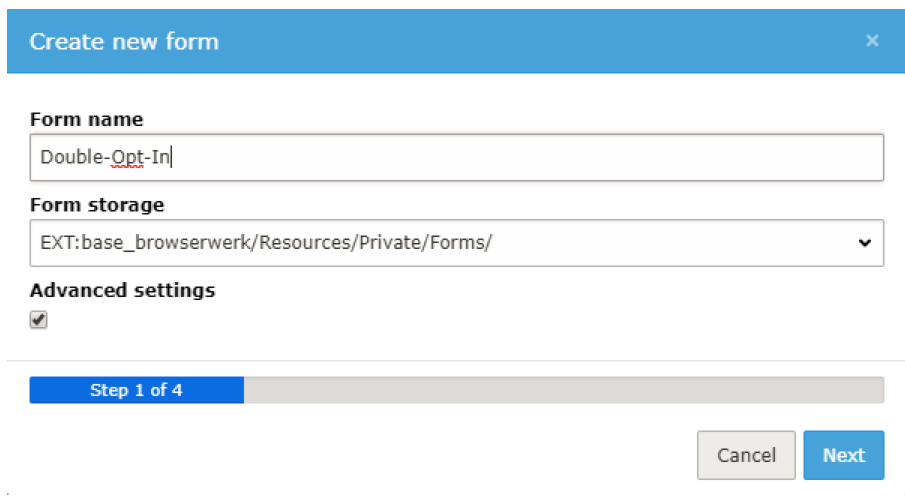
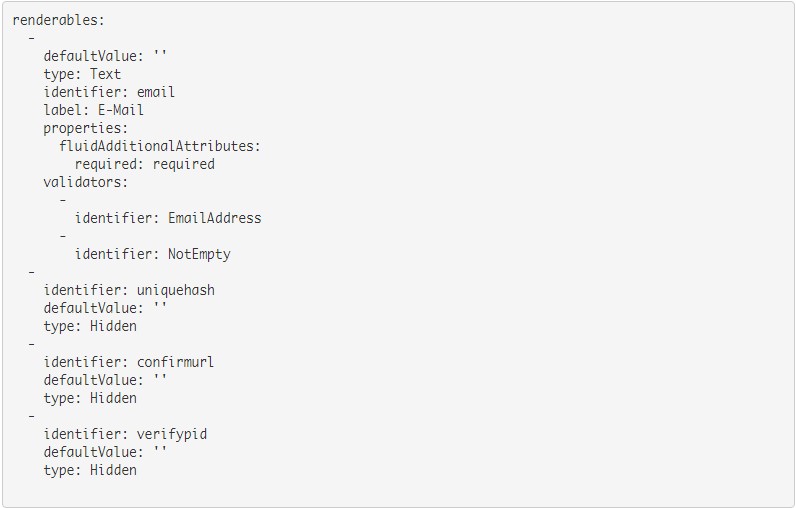
In our case a form with an "e-mail" is enough of an example.
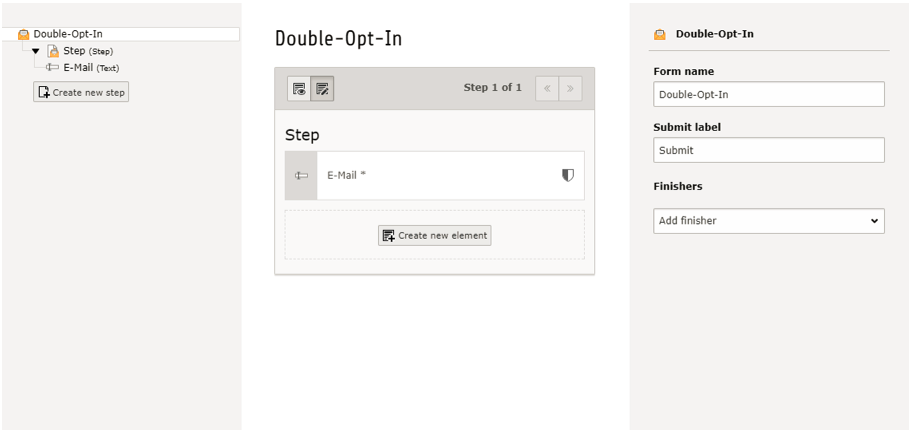
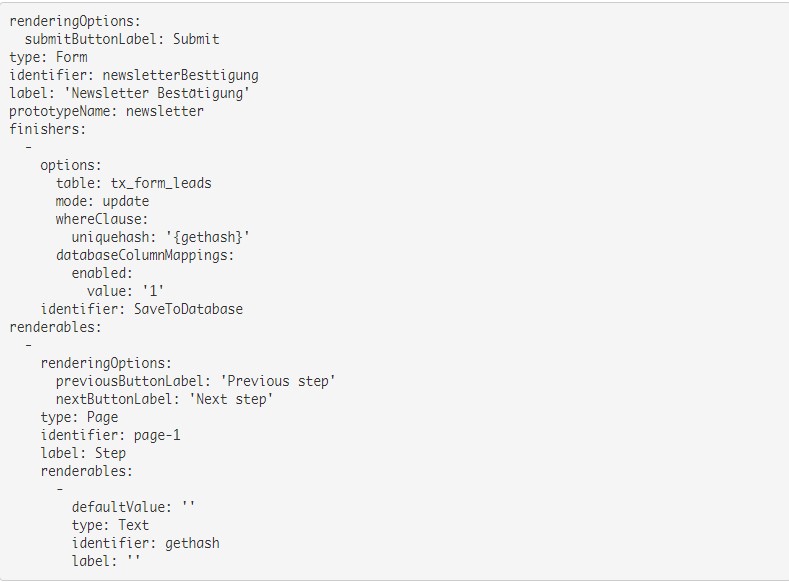
After creating the form, the double-Opt-In.form.yaml appears in our defined path
First we want to change the prototypeName attribute from 'standard' to our previously defined prototype 'contactform'.
For our simple contact form, the configuration defined in the CustomFormSetup.yaml will work.
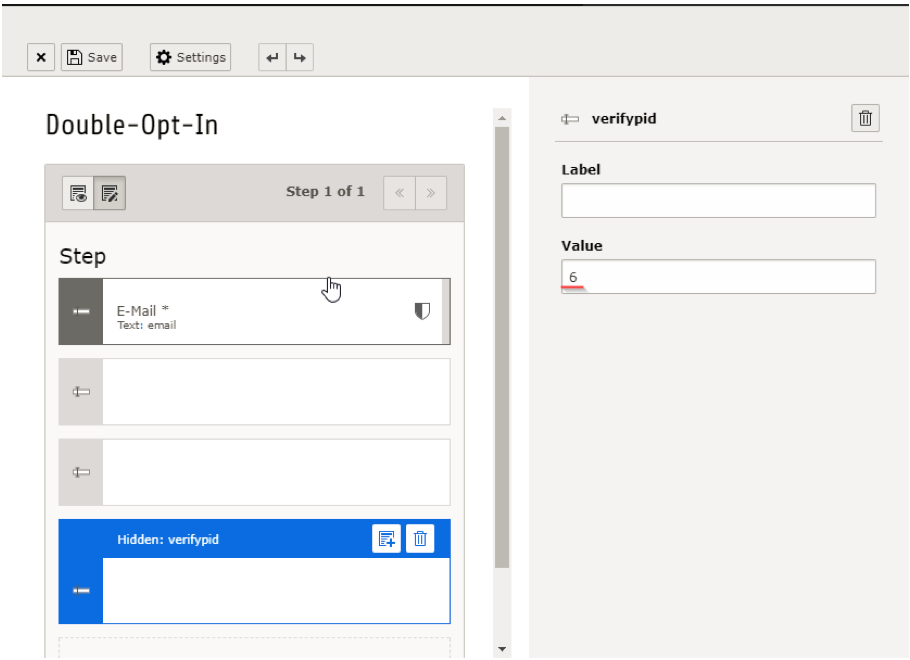
Before that we, create a hidden "uniquehash" field which we will fill later via hook, as well as the fields "confirmurl" and "verifypid". What we will see later. For this we also adapt the idetifier of the e-mail field
The configuration of the finisher is easy to understand and can be done quickly.
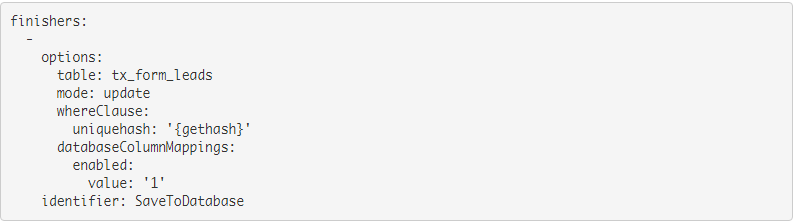
We can now configure the SaveToDatabase finisher:
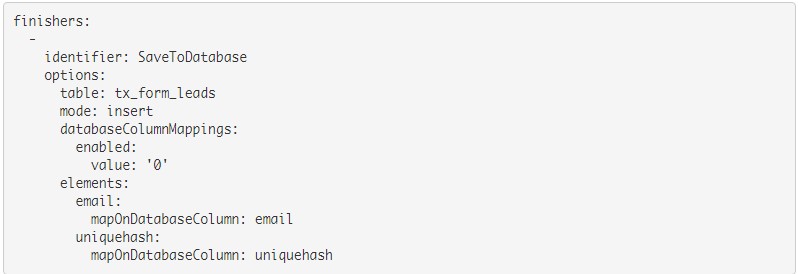
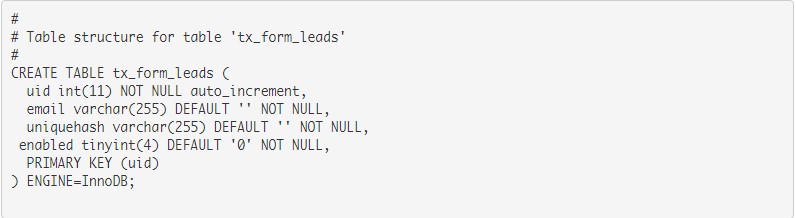
The table tx_form_leads still needs to be created, this is known to be done via ext_tables.sql
In ext_localconf we register the following hooks:
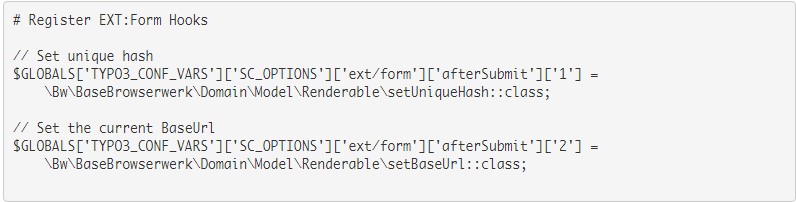
The hooks look like this:
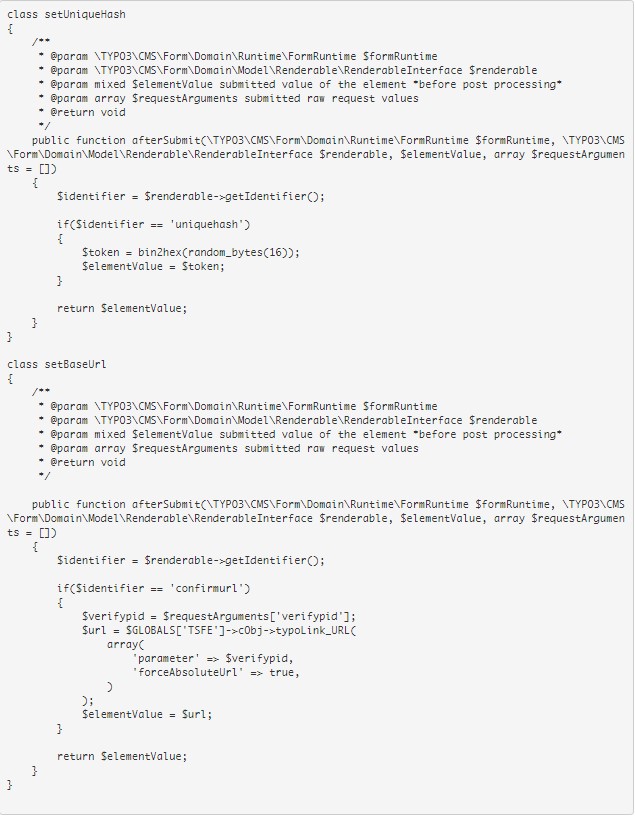
When we look at the class setBaseUrl we realize why we need the fields confirmurl and verifypid.
The integrator / editor can enter the ID of the page on which the user is validated in "verifypid".
We then create a URL via typoLink, which will be given to the user in the email for verification.
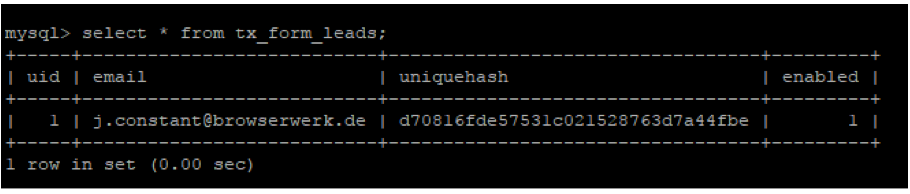
If we now fill in our form, we can already get an entry with an ID, an e-mail hash and enabled = 0 in the database.

Of course, the user needs an email with which he can confirm his registration
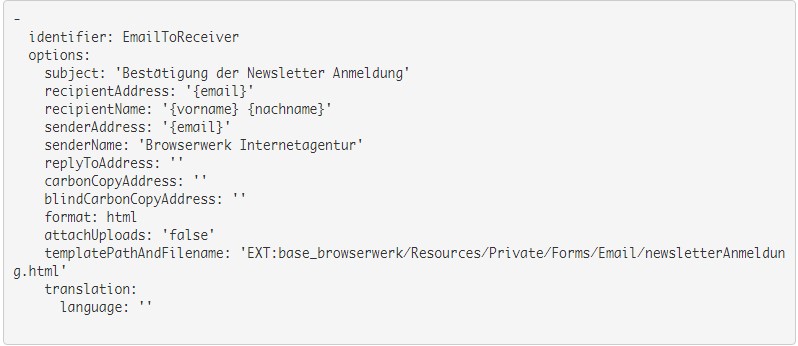
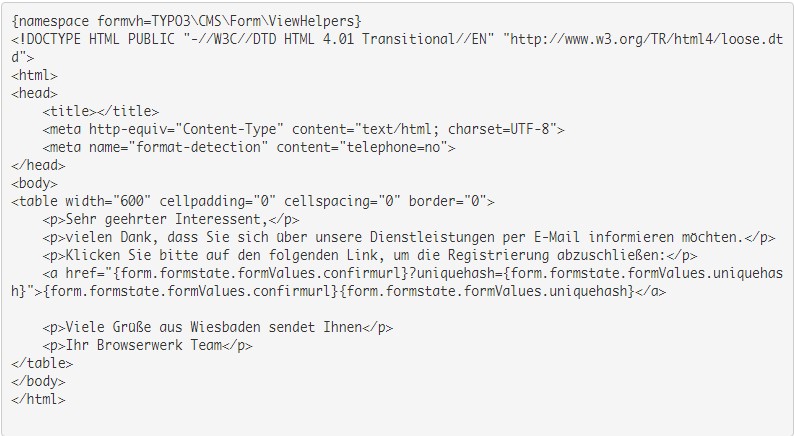
In the specified HTML file we can then create our e-mail template. Via {form.formstate.formValues} we are able to acces the fields in the form.
A simple template might look like this:
For this to work, we still need to create a page on which the hash is validated. Damit das funktioniert müssen wir aber noch eine Seite anlegen auf welcher der Hash validiert wird.
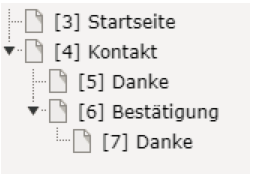
In this case, this page has the PID 6, so we enter it into the field "verfiypid“ in the form:
If we will in the form we will recieve the following email: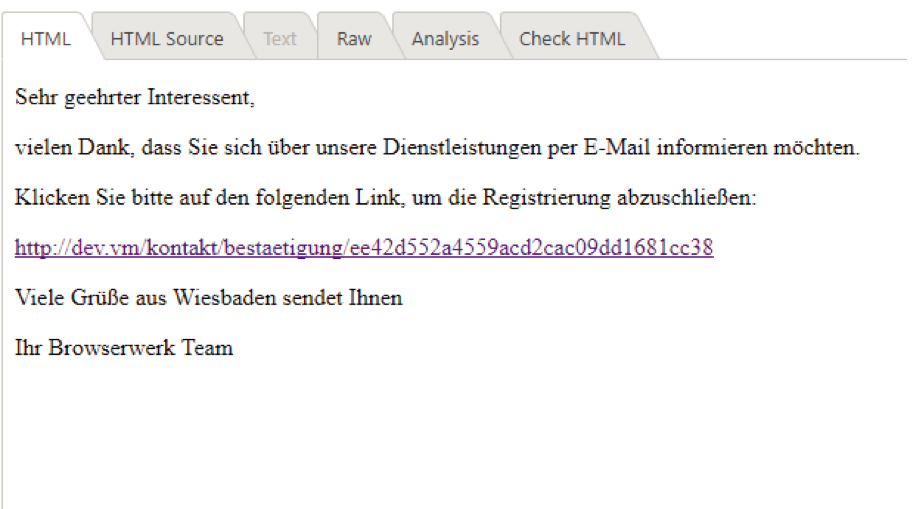
So now we have a database entry, an email and a link which leads us to the right page.
However, there is nothing to see on this page and there is no validation method yet.
As you know, many roads lead to Rome, and there are a lot of possibilities for the next step. I'm going to present a way that I think is a clean and simple solution to validate the hash and update the entry in the database.
We will create another form on the validation page which searches for the submitted hash while sending it to the database and sets the associated entry "enabled" to 1.
To keep the tutorial compact, here is my complete form definition of the confirmation form:
We need another hook so that "gethash" is also filled.
This is registered as usual in the ext_localconf:

The associated hook:

The hook looks for the post variable uniquehash, puts it in the field 'gethash' and then executes an autosubmit script.
The actual magic now happens in the finisher of the validation form:
As a conclusion, I recommend the redirect finisher on a thank you page, so the user has a feedback as conclusion that everything worked out.
And a look in the database also confirms that everything worked:
Contact us
Office Wiesbaden
Mainzer Straße 75
65189 Wiesbaden